Recently I asked Joseph Michael to present a webinar on the ins and outs of Scrivener to readers of this blog.
While I was the host of the webinar, I was also a very willing attendee. You see, I have known about Scrivener for a long time. Friends like Michael Hyatt and Jeff Goins, both bestselling authors, have been singing its praises for years. But I’m embarrassed to admit I never took the time to learn about it.
Here I am a full-time writing coach, and I don’t know my way around what’s been called “the best word-processing program ever invented for writers.” For shame!
I showed up to the webinar ready to learn . . . and I was absolutely blown away.
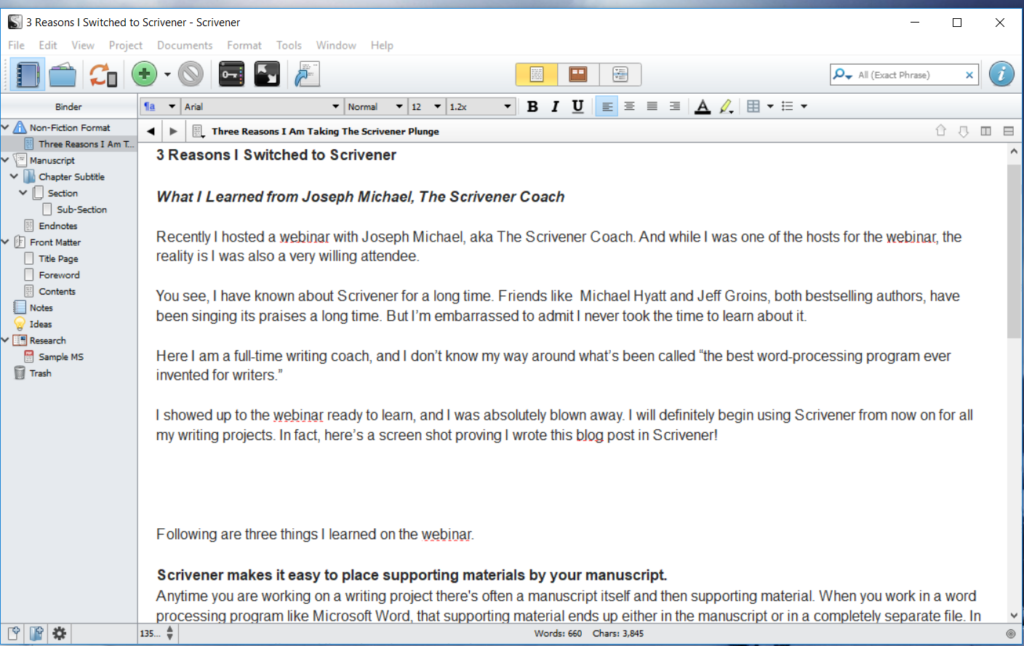
From now on I will definitely be using Scrivener for all my writing projects. In fact, here’s a screen shot proving I wrote this blog post using Scrivener!

Here are three things I learned about the power of Scrivener from Joseph Michael on the webinar.
1. Scrivener makes it easy to place supporting materials beside (not in or totally separate from) your manuscript.
Anytime you are working on a writing project there’s often the manuscript itself as well as supporting materials. Supporting material includes research, illustrations, quotes, ideas, outlines, permissions information, documentation, questions you need to ask someone, and so on.
When you work in a program like Microsoft Word, supporting materials end up either in the manuscript (where you have to delete them later) or in a completely separate file (where you might have trouble finding them later). In Scrivener all that supporting material lives (quite literally) parallel to the manuscript.
It’s difficult to explain if you’ve never used the Scrivener interface, but all your supporting material is neither in the manuscript nor completely separate from the manuscript. It sets right beside the manuscript in the place where it is most relevant. I can’t tell you how powerful it is to have all of that material right beside your manuscript exactly where its location makes the most sense.

2. Scrivener helps you categorize and label different types of content.
Inside Scrivener, it’s very easy to do two things that are virtually impossible to do in a program like Microsoft Word. The first is dividing your content into sections or, as we professionals like to say, “chunks.” The second is labeling those different chunks.
What this means is you can develop any categorization system you want for your content and easily label the different pieces using those categories. For example, I often encourage writers to have a good balance between concrete material (for example: stories, illustrations, quotes, and metaphors) and abstract material (teaching, principles). Scrivener makes it easy to label content either concrete or abstract.
In this way you can quickly see how much of either type you have. You can even colorize the different types of content.
[Tweet “3 Reasons I Ditched Word for Scrivener #amwriting @ChadRAllen @ScrivenerCoach @ScrivenerApp”]
3. Scrivener allows you to track your writing progress in a way that is both helpful and fun.
Let’s say you’ve written 20,000 words of a 50,000-word manuscript. Your writing days are Mondays, Wednesdays, and Fridays, and you’re working with a deadline of April 1st. Wouldn’t it be nice to know how many words you need to write each day to hit your goal of a 50,000-word manuscript by April 1st?
In Scrivener, you can accomplish this with just a few keystrokes. Plus, for instance, if you want to add or remove a writing day, it’s very simple to make adjustments. As if that’s not enough, Scrivener awards you with a chime when you have hit your word count goal. Fun!
Are you interested in Scrivener yourself?
The above are just three of many, many reasons I will begin using Scrivener for all of my writing. If you are interested in Scrivener, I encourage you to check out the replay of the webinar Joseph Michael and I recently presented. There’s just one catch. Its only available until midnight tonight (Monday, December 17). It’s worth your time!
Click here to view the replay.
[reminder]Have you heard of Scrivener?[/reminder]
I LOVE Scrivener and wish I’d had it when I wrote my first book! Thankfully, I got on board with it when I began my blog almost 5 years ago. I have folders full of research material, not just for my blog and books, but also about writing, platform/marketing, social media info, and related things to do. It makes reposting links to previous posts easy, since I have all of them right there (and a list of whenever they’ve been posted). I even have a folder with the pdf of my entire first book in it so I can refer back to it and have quotes and page numbers at my fingertips. I love how I can look at 2 pages side-by-side so I can compare or borrow info between the 2. It simplifies the writing process so much! Good choice, Chad! You won’t regret it!
Thanks, Pam, for the vote of confidence and also for sharing how you’re using Scrivener!
My wife and I are co-writing our book in Scrivener right now. I love it.
Woot! Thanks for taking the time to comment, Geoffrey!
I’ve been “using” Scrivener for the past couple of years…just not very well. After attending Joseph MIchael’s webinar, I was amazed just in that short time to hear about so many features I never even knew existed. I immediately bought his training and am learning and implementing them in my book writing already. A great investment in myself and my productivity. Just being able to keep things in one project file with various labels helps me from losing my supporting research and examples. Thanks Chad for sharing your insights and this webinar.
You’re so welcome, Cherryll, and thank you for commenting! I’ll be learning right alongside you… 🙂